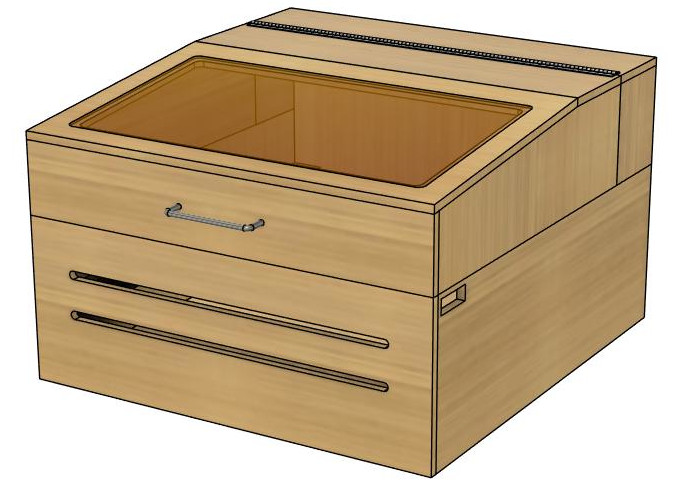
How To Build An xTool Laser Enclosure With Smoke Extraction And Laser Shielding - Plans Available

Ever since I started using my xTool, smoke and fumes in my workshop have been a problem. Also, I couldn't work on other projects while the xTool was in operation without wearing safety glasses. To solve these problems, I built an xTool laser enclosure with smoke extraction and laser shielding.
Full build plans and the supplies list including product links are available here: https://www.kiwiworkshop.com/plans/xtool-laser-enclosure/
Illustrated step-by-step assembly instructions are included in the plans.
Enclosure Design
The main design considerations were as follows:
- Size - The enclosure should be large enough to comfortably hold an xTool D1 Pro but not take up too much space in my workshop
- Smoke extraction - The design should allow for mounting a ducting flange and ideally an extractor fan
- Air flow - After reading up on this topic, I decided the best approach was to evenly directly air flow above and below the workpiece (catering for both cutting and engraving)
- Rotary attachment support - I don't own a rotary attachment but wanted to come up with a design that would accommodate one in the future
- Laser shielding - It should be possible to view the xTool during operation without having to wear safety glasses (although that is still recommended!)
- Honeycomb support - The design should accommodate an xTool honeycomb at an appropriate level below the xTool
- Ease of access - It should be easy to access the xTool from above and below (i.e. it should be easy to clean out any small offcuts that fall through the honeycomb below the xTool)
- Power and USB sockets - Access needs to be provided to the xTool power and USB sockets
To satisfy points 4 and 7, I decided to go for a design with an opening lid and removable front panel. The next step was to decide on length and width dimensions, both of which were based off the physical size of the xTool plus a small margin. For the height dimension, the main consideration was placing the xTool at a height that would support the rotary attachment plus the largest expected object being engraved.
For point 5, I first thought of having a large laser safe window spanning close to the width and length of the enclosure. I soon realized this wasn't necessary, since by having a sloped lid, you can get away with half as much laser shielding and still be able to view the entire xTool.
For the enclosure material, I decided to go with 12mm [1/2"] MDF. This should keep the enclosure reasonably light and is thick enough to support glued butt joints. No major stress is expected on the enclosure body which means there is no need to use screws in the construction.
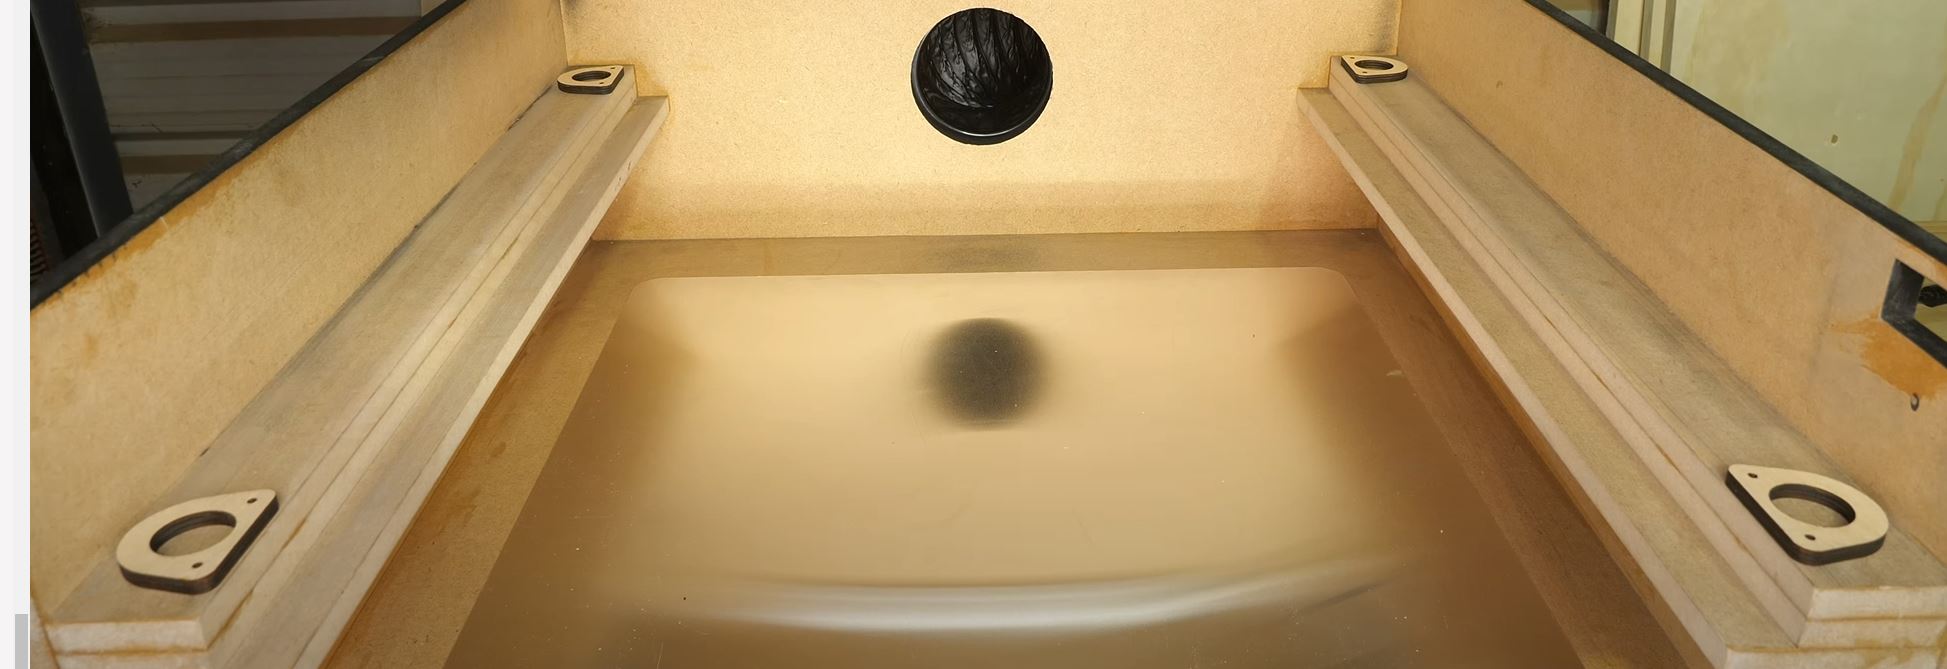
Correctly positioning the xTool and honeycomb at suitable levels was another important design consideration. In the end I went for a design which consists of two open shelves mounted on each side of the enclosure. This also allows for sliding the xTool and honeycomb in and out of the enclosure when required.
The following image shows the two shelf levels with the xTool and honeycomb in place.

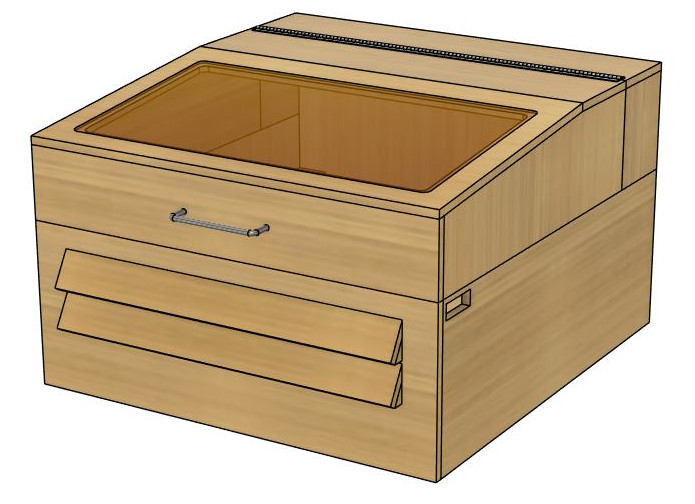
The next design consideration is airflow and the position of the honeycomb dictates where the airflow should be directed. As mentioned under point 3 in the design considerations, I decided the best approach was to direct air flow above and below the workpiece. This effectively means air flow should be directed above and below the honeycomb. To facilitate these requirements for airflow, I decided to include two open slots in the front panel lined up with a ducting hole in the back panel.
One issue with having open slots in the front panel is it makes it possible to look directly at the laser, or laser reflections. I therefore needed to somehow shield these slots. I couldn't find anything off the shelf so decided to make vent covers from MDF with angled cuts on the table saw. The following image shows the vent cover design, I guess you might also call them louvers.
Laser Safe Shielding
Tracking down laser safe shielding for the enclosure turned out to be quite difficult. There certainly didn't appear to be anything readily available here in New Zealand. In the end I found a company in the USA called J Tech Photonics who supply laser safe shielding in sizes and volumes suitable for hobbyists. To avoid any further delays on the project, straight away I went ahead and ordered a 24" x 12" panel of 250nm to 520nm shielding. It took around 1.5 weeks to arrive. A link to the J Tech product I ordered is on the xTool enclosure supplies list page.
Smoke Extraction Fan
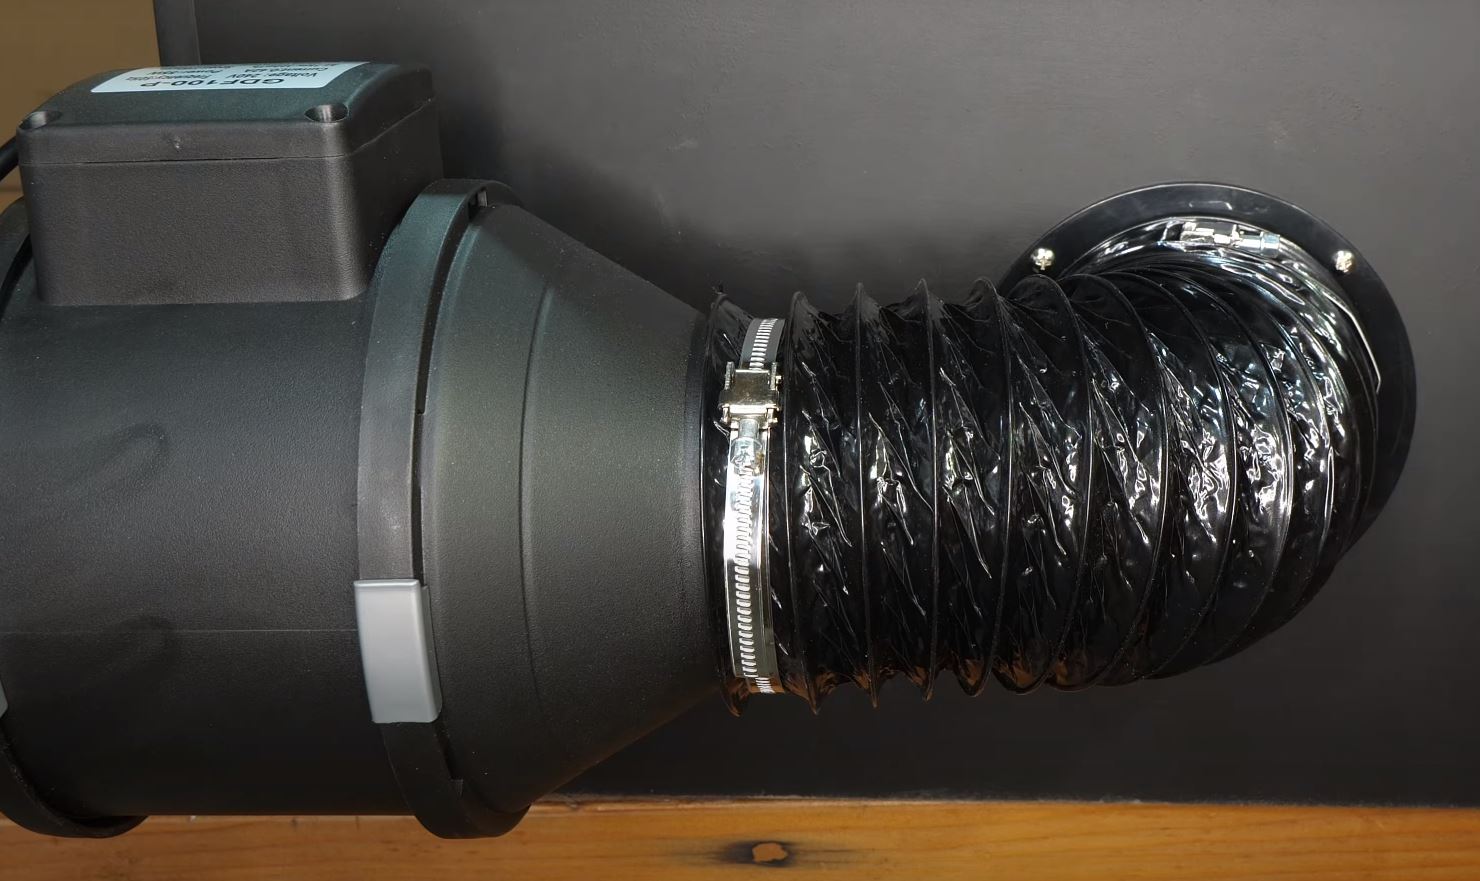
The two main considerations for the smoke extraction fan were 1) it had to be powerful enough to efficiently extract smoke generated by the xTool, and 2) ideally it would be mountable on the back of the enclosure. To start with I knew I wanted to go with a fan significantly more powerful than the fan included with xTool's own foldable enclosure. I read a few posts where owners of this enclosure complained that it wasn't powerful enough to effectively remove smoke generated by the xTool. Apparently it was common for quite a bit of smoke to escape from the enclosure. Looking at one unofficial replacement fan kit for the xTool enclosure, I saw that it had a 10W fan. To be on the safe side, I thought I would aim for a 40W fan. The closest I could find was a 55W 100mm [4"] inline fan. And looking at the dimensions, I could see that it would fit on the back panel and included a mounting plate. At 55W and 2350rpm it's possibly more power than is required for the size of the enclosure, however, I would rather overcompensate than risk having toxic smoke leaking out into my work environment. The following image shows the 55W inline fan mounted on the back of the enclosure. The duct flange is centered with the level of the honeycomb panel.
Finishing / Painting
I usually finish any MDF project with polyurethane to help protect it in the future. But for this project, I thought it would look cool to paint it black, especially since I had black components mounted on the enclosure (inline fan, ducting and a black power board). Past experience told me that painting MDF directly would result in a "fluffy" surface, so I read up on good primers for MDF. A good solution appeared to be shellac based wood sealers, so I went with this. One layer of a shellac wood sealer followed by a couple of coats of black spray paint resulted in a smooth and professional looking surface. Between the shellac and paint, I lightly sanded all surfaces with a fine steel wool.
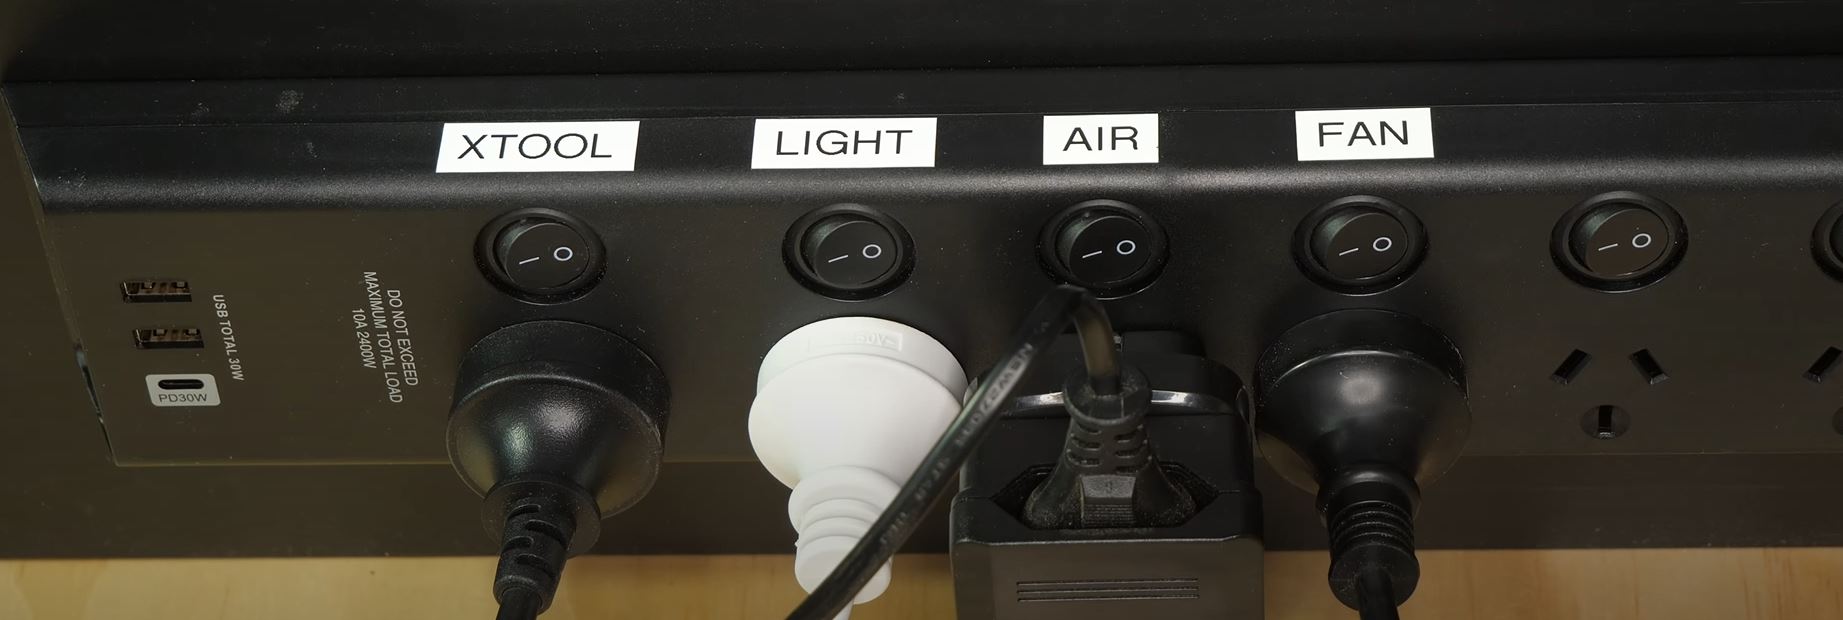
Power Board
To help manage controlling each electronic accessory in the enclosure, I decided to mount a switchable power board on the side. I also labelled each socket, making it easy to identify which switch was for each accessory.
xTool Feet
The final step of the build was making some laser cut xTool feet. This was also the first test of the laser enclosure. The xTool feet will keep the xTool held in a fixed location within the enclosure. This will help with future alignment/positioning operations and also stops the xTool from moving when inserting the power or USB cables. Free digital files for the xTool feet are included with the build plans.
Summary
I'm really pleased with how the laser enclosure worked out. It's highly effective at extracting smoke generated by the xTool and I can't smell any smoke when it's operating. There is a slight smoky smell when the lid is opened after the xTool has been operating, but this is expected since the freshly cut/engraved material will give off a burnt smell for a few hours.
It's also very convenient to be able to work on other projects in my workshop without wearing safety glasses when the xTool is operating. I would still recommend making a habit of wearing safety glasses whenever opening the enclosure lid.
Make sure you watch my xTool Laser Enclosure YouTube Video for this build since further build steps are covered.
If you have any questions about the laser enclosure, just drop me a message on the website contact page.
Daniel