How To Build A Stylish Wooden Bluetooth Speaker - Plans Available
This Bluetooth speaker not only looks great, it sounds great too! I've had the design for the speaker in my head for a while now and finally got around to building it.
Full build plans and the supplies list with product links are available here: https://www.kiwiworkshop.com/plans/wooden-bluetooth-speaker/
For this blog post, I will cover the main build steps at a high level. Detailed assembly instructions and dimensions are available in the plans. Every step of the build process is also included in the YouTube video for this build (click on image above).
The Bluetooth Speaker Design
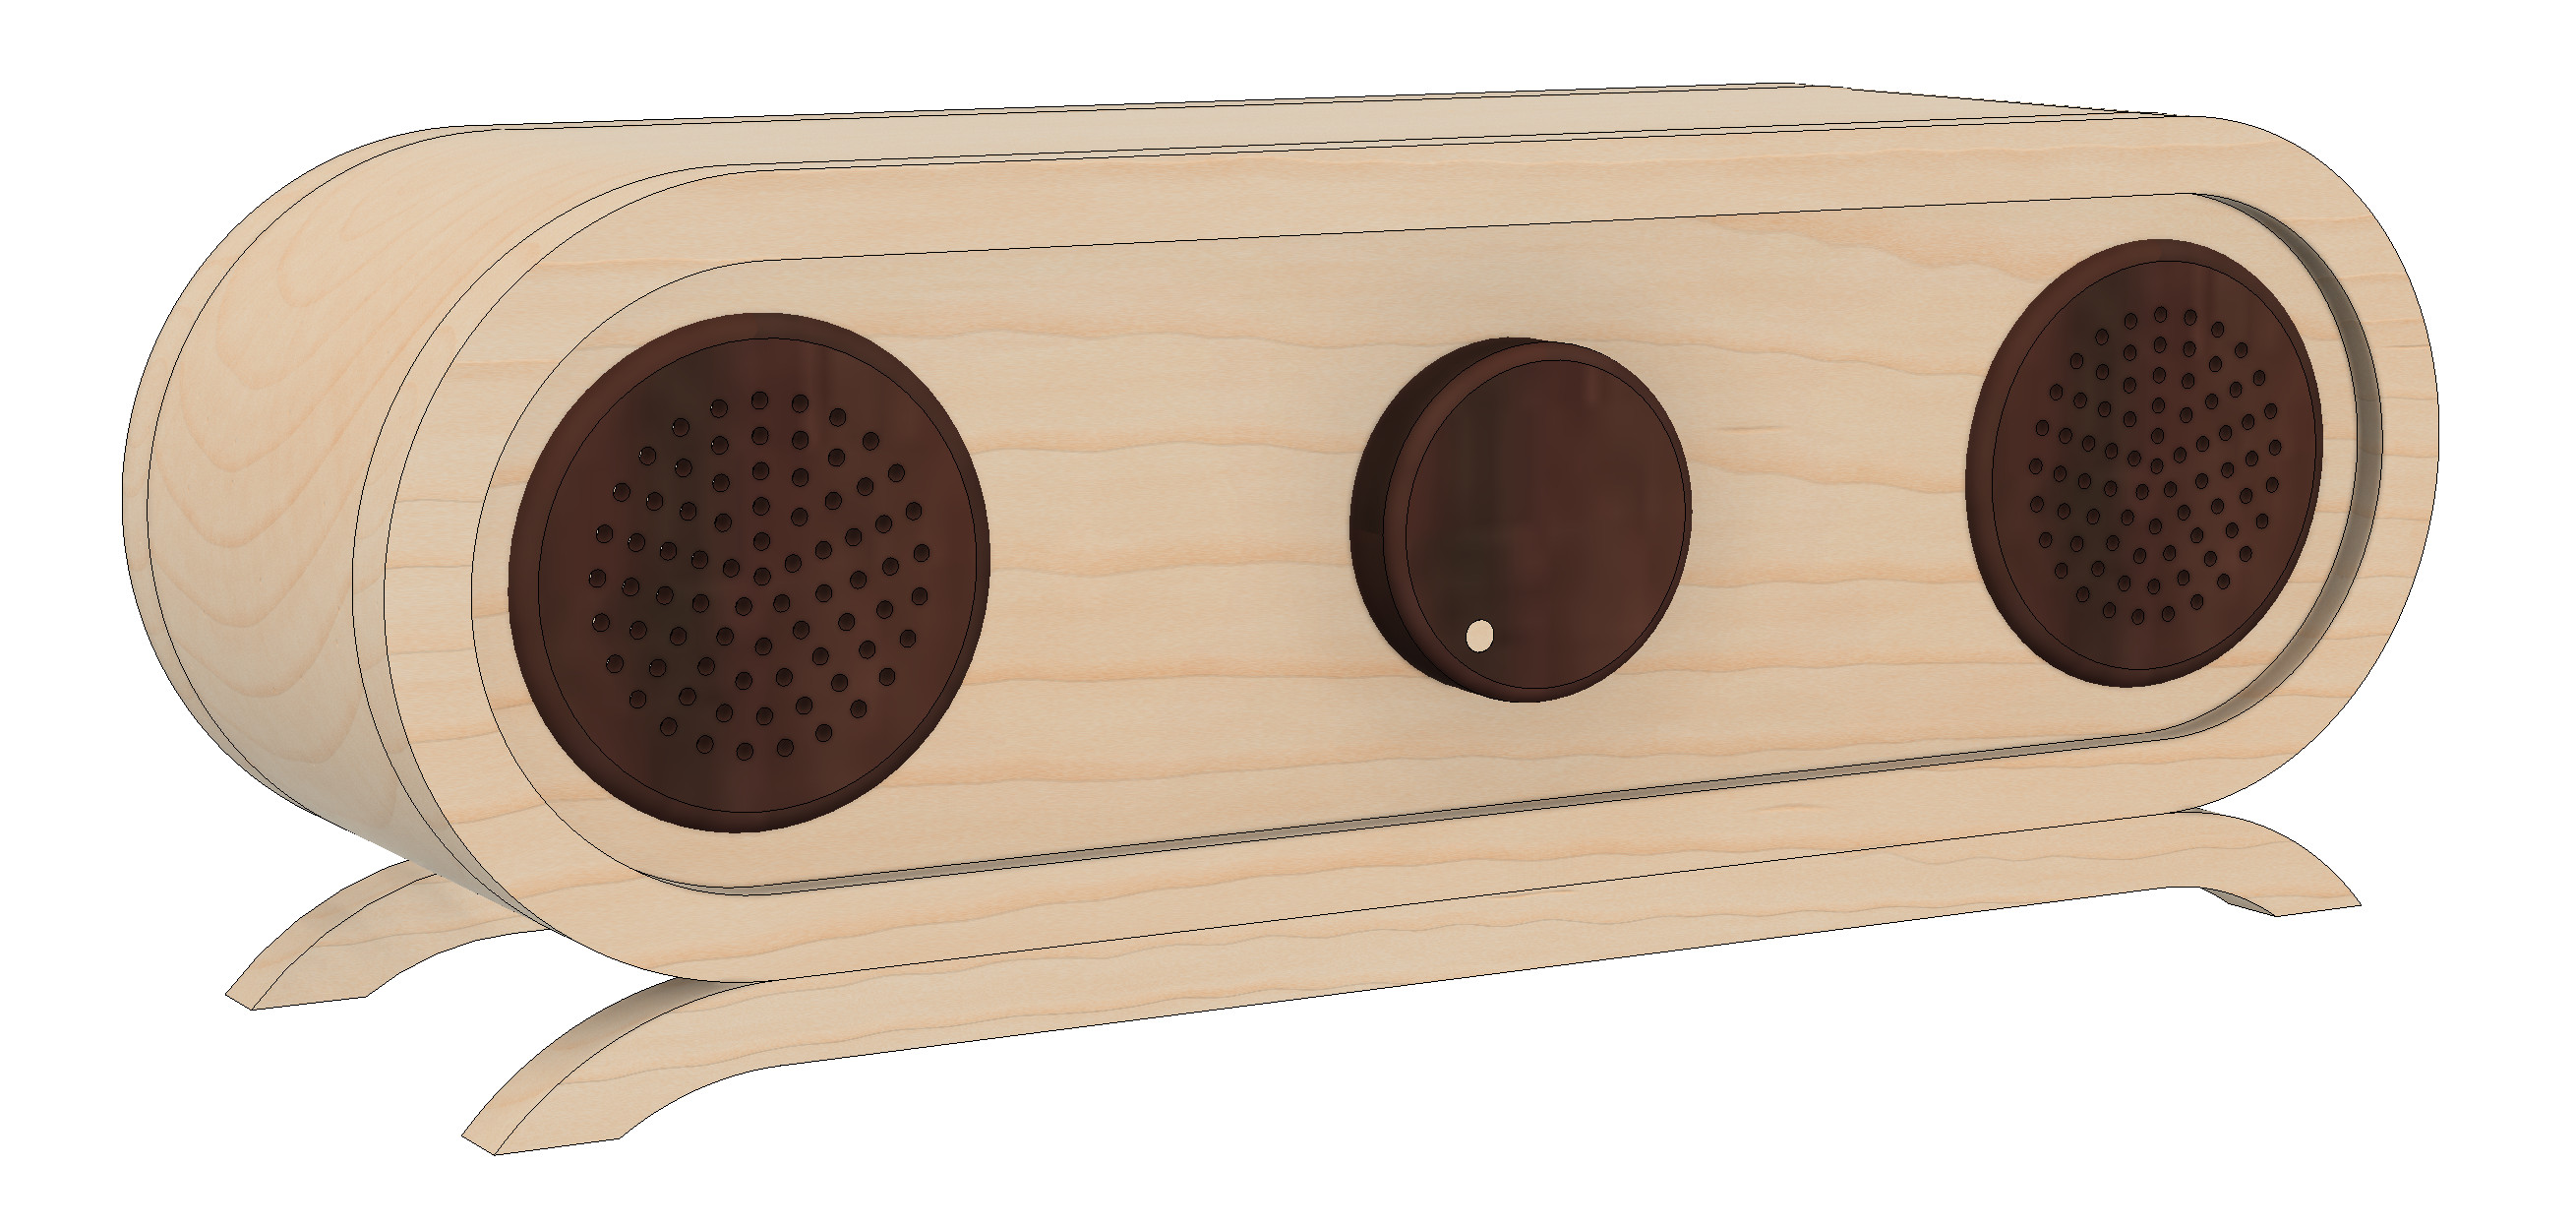
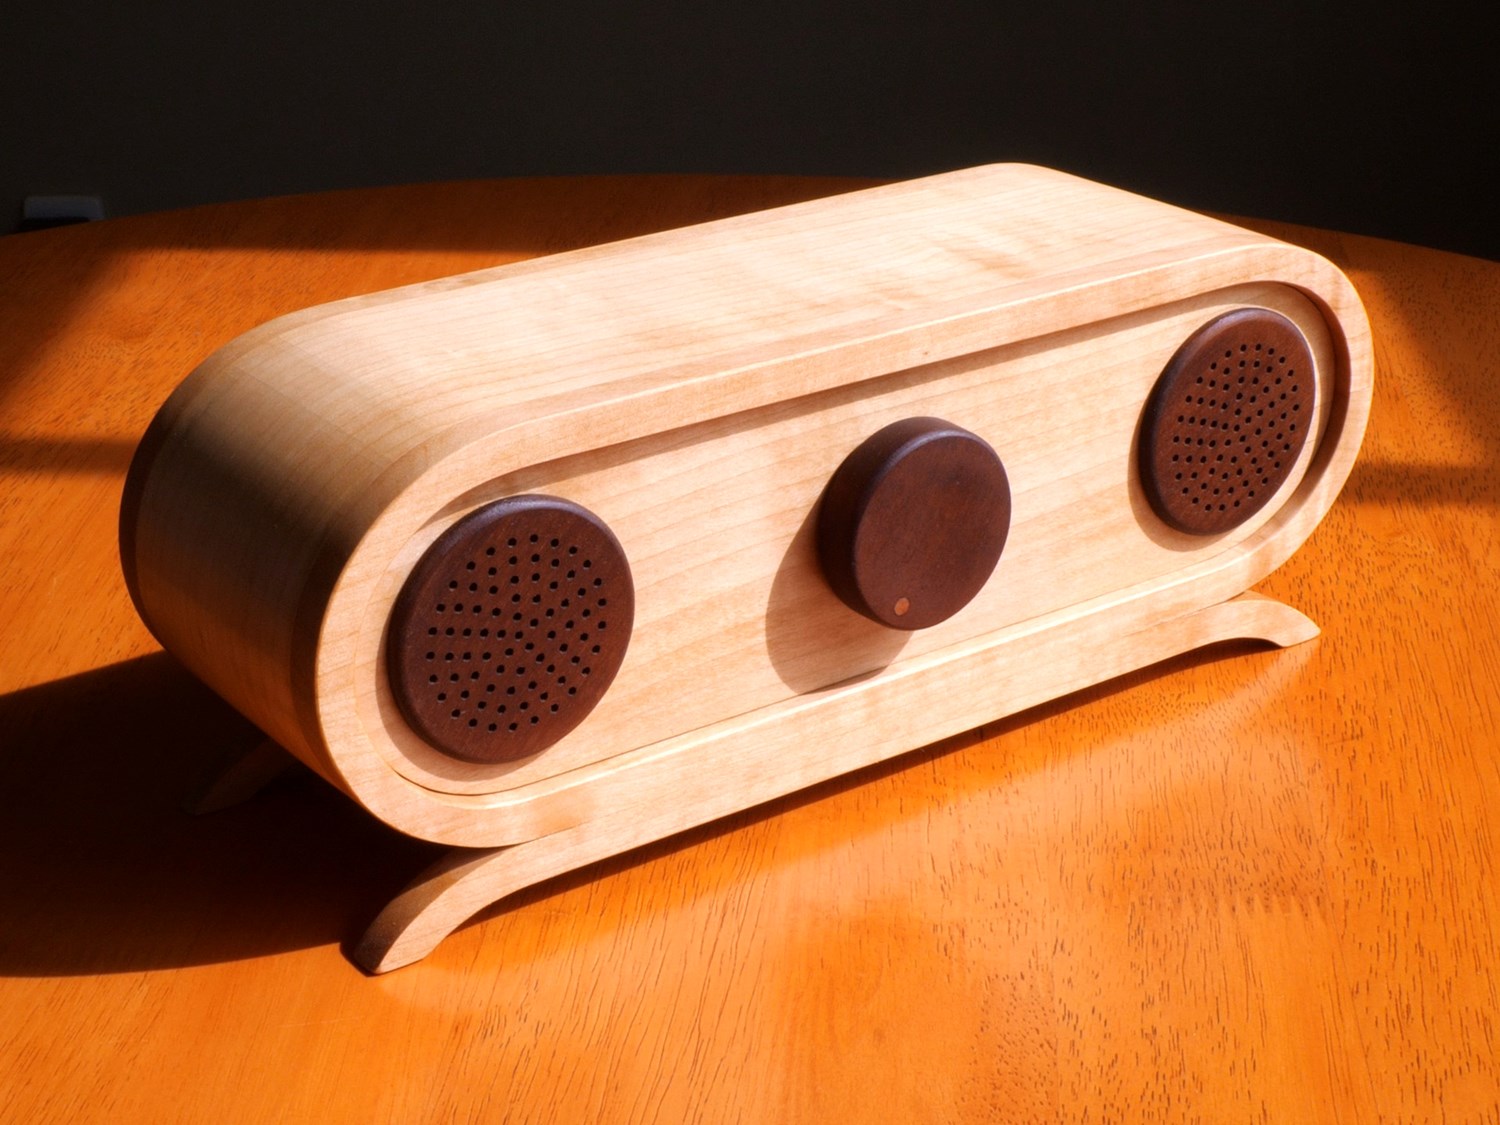
I started the design with two round speakers sketched on a piece of paper and the rest of the design flowed from there. Naturally, the speaker body ended up curved, following the round profile of the individual speakers. Next, I had to decide which method of wood bending I would go with. I settled on the kerf bending method, but this raised the problem of how to cover the kerf slots, since they would be exposed on the edges of the speaker body. To solve this problem, I decided to glue a panel of wood on each side of the speaker then flush trim the inside and outside edges on my router table. You can see the flush trimmed edges on the model image above.
The next decision to make was how to include speaker grills, or should there be grills at all? I wanted to build as much of the speaker from wood, so came up with the idea of making speaker grills by drilling many small holes in a circular piece of wood. I was slightly concerned about audio quality and whether the speaker grills would block the sound from the speakers. They turned out fine and the audio quality is really good! No issues at all with volume and I've never had the need to have the speaker up at full volume.
Since I had decided to make the speaker grills from wood, it made sense to do the same for the volume knob. The next challenge was what to do for the volume position indicator. I really didn't want to apply any paint to the speaker, so had to work out how to make a volume position indicator with wood. The two ideas I had were a) cut a slot down to the center of the volume knob with a contrasting section of wood glued in the slot or b) drill a hole and glue a small dowel with contrasting wood colour in the hole. I went with option b and it turned out really well.
For the speaker feet, I had the idea of reflecting the main speaker body profile. Not only would this add a nice balance to the design, it would also add an element of furniture design to the speaker. Perhaps you would call it a mid-century look with the narrow feet? To create the speaker feet, I roughly cut the edge profile of the speaker body from a piece of wood then attached it to the speaker body with double sided tape. I then flush trimmed the wood to the profile of the speaker body on my router table.
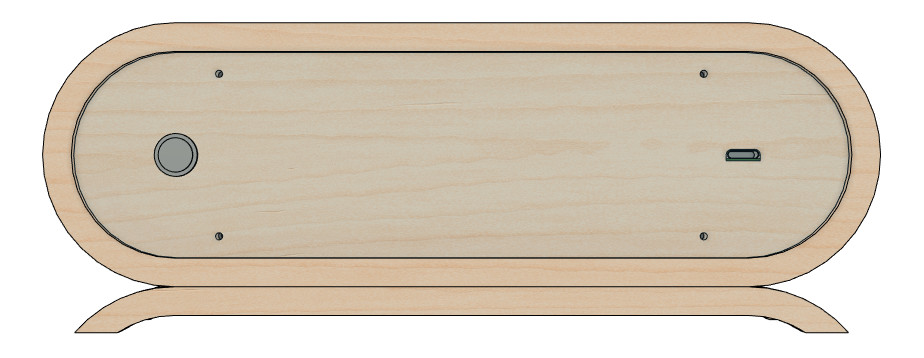
For the back panel of the speaker, the main requirements were to support a power switch and USB-C charging port. I didn't want any plastic exposed on this speaker, so went with a round metal panel mount power switch. For the USB-C charging port, I couldn't find any panel mount options, so went with a small PCB component that has a USB-C connector mounted on it. This solution requires cutting out a profile in the back panel to support this component. The back panel should also be removable for servicing. This was solved with four screw holes allowing screws to be inserted into internal mounting tabs.
The Bluetooth Speaker Electronics
My main goal with the electronics for this speaker, was to keep it as simple as possible, hopefully at a level where someone with little or no electronics background would be able to complete the build. To help achieve this goal, I searched for simple electronic modules that would include most of the functionality "out of the box".
For the amplifier, I decided to go with a PAM8403 2-channel amplifier board with potentiometer. This is great since the potentiometer is panel mountable and is the right length for the volume control knob. It also sets the circuit board conveniently between the two speakers on the back of the front panel ready for wiring.
After looking into a few solutions for the Bluetooth receiver, I decided to go with an M18 2-channel Bluetooth receiver board. It provides all the functionality required for this speaker and the product reviews were really positive. As a bonus, this board doesn't include an annoying voice when Bluetooth is online or ready to pair. Instead, it has a couple of pleasant sounding chimes.
For the speakers, I went with a couple of 3W, 8 ohm speakers with a 50mm round design. They are compatible with the PAM8403 amplifier and the product reviews indicated they were of high quality for the price.
The above circuitry can be powered with a 5V power supply which was the first requirement when looking into power supply options. In a lightbulb moment, I had the idea to power the speaker with a USB power bank. This would provide way more battery life than a single lithium-ion battery and provide simple USB charging and power ports. The trick would be finding one small enough to fit in the speaker body! There weren't many options available but managed to find this 10000mAh Mini USB Power bank on AliExpress. It works great and provides many hours of speaker run time, way more than my UE boom! I did have a small issue with it going into sleep mode however and I discuss the solution to that problem in the following paragraph.
After an initial power up test once I had completed the Bluetooth speaker circuitry, I noticed that the USB power bank kept going into sleep mode and shutting down its output power. Even when I had the speakers up at full load (max volume), this was still happening. It's because Bluetooth circuitry wasn't using enough power to make the power bank think it was still plugged into a device. After some experimentation, I solved the problem by adding an 82 ohm load resistance. I didn't have an 82-ohm resistor available, but made up this value with two resistors of smaller resistance in series. I would recommend a single 82-ohm, 0.5W resistor if you complete this build. Make sure the power rating is at least 0.5W to be on the safe side. If you use a different USB power bank, the required resistor value might be different, or it might not be required at all if your power bank doesn't go into a "sleep" mode. The power can be calculated as P=VI, where P=Power, V = Voltage (5V) and I = Current. Current can be calculated as I=V/R, where R = your resistor value.
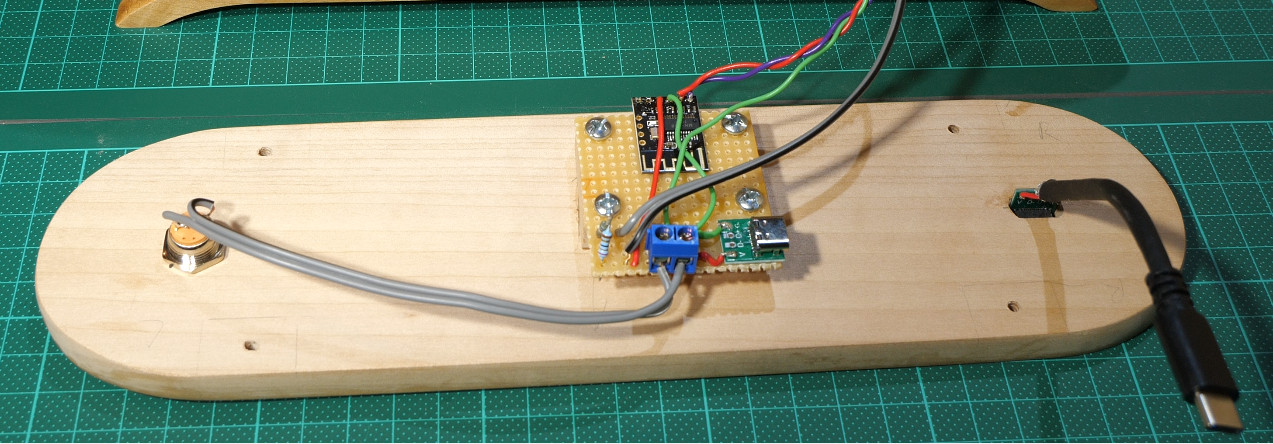
The following image shows how all the Bluetooth speaker circuitry comes together. The wires going off the top of the image go to the PAM8403 amplifier board on the back of the front panel. The Bluetooth receiver board is the dark green board towards the top of the image. The final step before closing up the back panel is to plug the USB power bank into the back panel charging cable and main circuit board.
For more details on the electronics, watch the YouTube video for this Bluetooth speaker to see every step of the build. A circuit diagram is also included in the build plans.
Final Thoughts
I had a lot of fun building this speaker and it turned out just as good as I imagined, perhaps even better! I'm very impressed with the sound quality this speaker produces, especially given the relatively inexpensive components it's made with. Every step of the process went well and I don't think I would change anything. The only hiccup was the issue with the USB power bank going into sleep mode, but that was easily fixed with the load resistor (as mentioned above).
For more details on this build, make sure you watch my Wooden Bluetooth Speaker Build YouTube Video.
If you decide to build this speaker and have any questions, I would be happy to help. Just drop me a message on the website contact page.
The plans and supplies list are available here: https://www.kiwiworkshop.com/plans/wooden-bluetooth-speaker/